
To move forward, you may just
have to step into the past. Reflecting on this adventure and
challenge, it seems kinda poetic, at least to me it does. In
an effort to keep the story brief and not have you fall asleep
while reading, lets just say that as a kid growing up in Southern
California during the heyday of big funny car shows, it is understandable
the desire to drive such a machine.
I can remember clearly the various
moments in time; going to Lions to see Gas Rhonda and his funny
car. This would be the same one my dad just built from the AMT
model kit. Then there is the time we went out to see Tim and
Dave Beebe with their new funny car. After all, the Beebe's father
and my grand father were very good friends, it was only fitting
to see this effort. It was then that I had the hook set in me
to some day race one of these cars. At 6 years old, most kids
wanted to be a cop, doctor, astronaut; not me, I wanted to race
a funny car.
Time goes by, and many memories
follow; at 7 years old I got the best birthday present you could
get, the Mongoose & Snake Hot Wheels set. Then there are
the 64 funny car shows at Orange County, seeing "Funny Car
Summer" at Los Altos drive in. Yes, growing up in So Cal
was kinda cool if you were into nitro and funny cars. There were
so many memorable cars too; Rat Pack, Pete's Lil Demon, Teachers
Pet, Pisano & Matsubara, Holy Smokes. The list just goes
on and on.
Many years go by, and I find
myself in a position to buy a really decent alcohol funny car.
With a ton of determination and passion, I pick up the car as
a roller. Keeping my lifestyle kinda simple, I start to acquire
the parts to complete the car. I soon find that I've jumped into
this at the worst time. Seems that the class was just entering
a technological flourish of sorts that saw many advancements
for the cars. Sure, I had a budget that seemed reasonable, but
in a few short years I saw the capitol investment to build a
decent car sky rocket. Initially I figured I could do this on
a shoe string budget, but that was blown out the window and I
then found myself having to make some decisions on what I'm going
to do.
After letting everything sit
for a couple of years, I got some silly idea on finding an older
body from the 70's era, mount it on my chassis, and build a simple,
70's style combination to go out and just have some fun with.
As luck would have it, I find a Satellite/Roadrunner body for
sale. After some phone calls back and forth, I strike a deal
to buy this body, sight unseen (OOPS!), and have a couple of
friends pick it up for me in North Carolina.
After a short while I find that
I'm not alone. It turns out that there are many others who have
decided to do the same type of thing with their cars. Forget
racing a fuel funny car in the big show, and running a reasonably
competitive alcohol funny car now takes some healthy form of
cash flow. But, you can build a simple nitro motor based on what
was used in the good ole days of match racing stars like Jungle
Jim. And you can do it at a fraction of what it costs to build
something that can run in either of the major sanctioning bodies.
I'm sure some must ask "why".
Certainly there is no organized body to promote nostalgia funny
cars; there are no rules on how to build one, and when you do
build one, where will you run it. I cannot speak for others who
have now done this, but for me, it is about a deep passion for
these cars. To me, this is an extension of my hot wheels collection,
and a realization of childhood dreams.
After taking delivery of the
body it was apparent that much work was ahead; lesson learned
about buying something like this sight unseen. Nonetheless, work
commenced and in short order it was decided that using the body
as a plug for a new mold would be the best course of action.
That brings us to where we are now, and what this story is all
about. I've been fortunate to meet many who I watched race when
I was just a kid; one of whom is Jim Murphy. Jim's line of "Holy
Smokes" funny cars make up some of my favorites as a kid,
and recently while chatting with Jim it has been decided that
as my current car is completed, painting it like Jim's funny
car from the '73 season would be a great tribute to the class
and era. For me, it will be like going back in time and having
the chance to drive a car that you watched as a kid from the
stands.
I hope to illustrate what has
gone into this project to bring it to life. I've never made a
funny car body, but have had a great interest in how it is done.
The following photos will help to tell the story on making a
new body, and in due time we will have a running tribute to Jim
and the funny cars of the 70's.
Before going any further it must
be pointed out that this project has Jim's endorsement, but it
doesn't mean he is throwing money into it. That part is my responsibility,
and should make for some good reading if not a good lesson on
how to get such a car together. This thing will be painted just
like Jim's car with the only deviations coming from what ever
sponsors can be picked up, and even then it will have to have
Jim's OK on the final look. Needless to say, a big thank you
goes out to Jim for his desire to see this happen, and providing
some extra motivation for this kid. Another huge thanks goes
to Don Ewald, for he is the one behind this website. I'm far
from being "web savvy", so having Don help get this
up is a big boost for the project.
So sit back, grab a cold one
and enjoy this ride.
Coyote out!
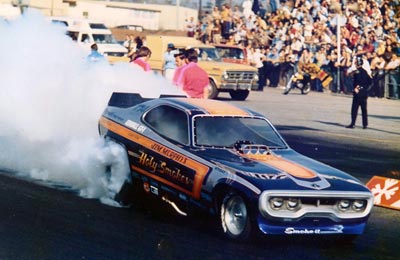
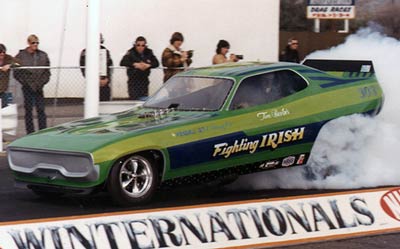
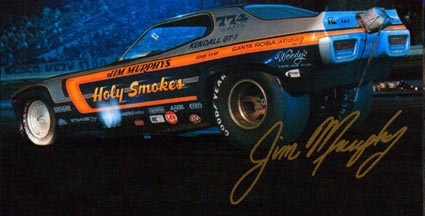 Jim Murphy
- "Holy Smokes" Plymouth Satellite - 1973
Jim Murphy
- "Holy Smokes" Plymouth Satellite - 1973
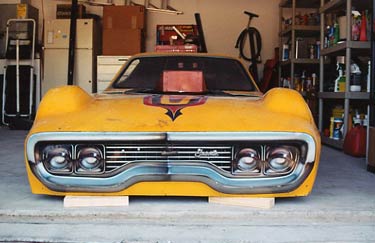
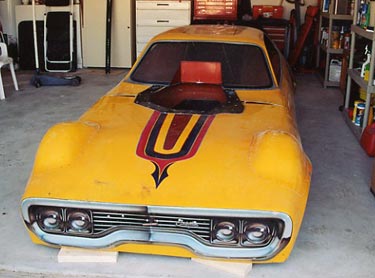
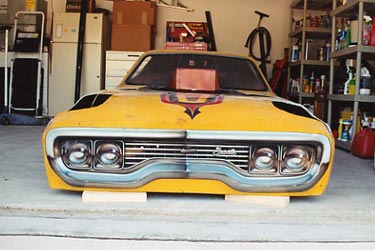
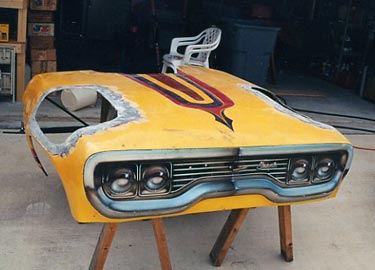
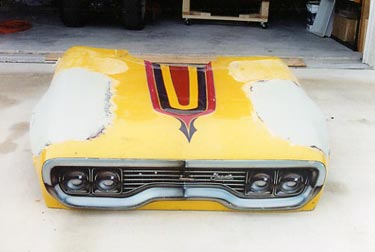
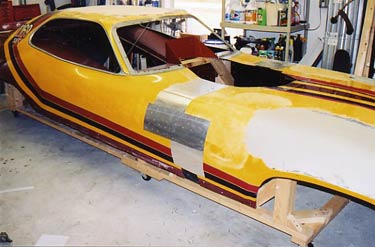
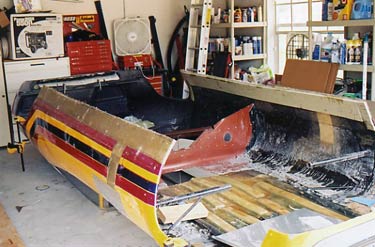
Like I said earlier,
this body was purchased sight unseen. As a result I had no idea
what shape it was in, both literally and figuratively. The history
of this body was still unknown at the time, but would be determined,
as well as be somewhat ironic. It is also obvious that the body
was modified greatly as it found it’s way on a “lay
down” chassis that was popular in the BB/FC ranks of the
70’s. You will also note that the mods were done in simulation
to the “Alcoholic” that was driven by some guy named
Dale Armstrong.
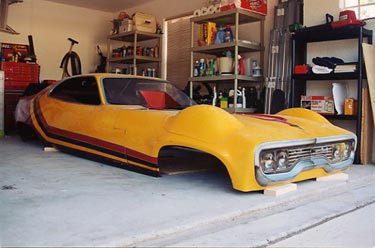
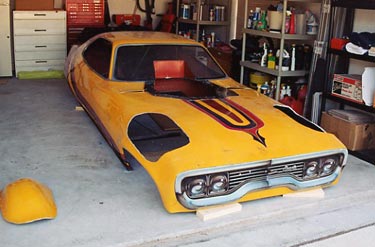
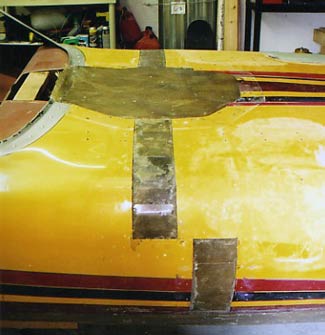
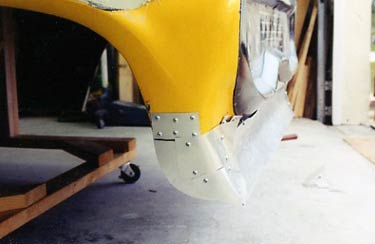
The first order
of business was to remove the fender bubbles that were added.
To locate the original line of the body I climbed underneath
and found the transition in the material. Using a drill I made
a series of 1/8 inch holes to outline the original body line
from the bubbles. Playing “connect the dots” I then
used a pneumatic hack saw to cut out the bubbles. You can not
imagine how thick the material is either, as each bubble weighed
over 5 lbs.
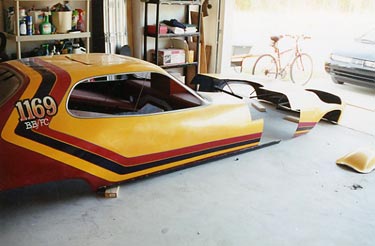
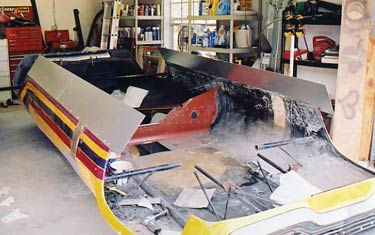
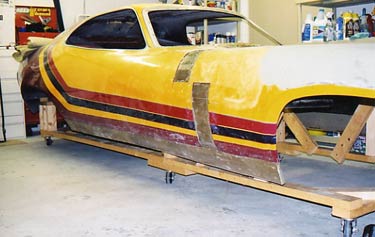
The body is originally
in a 118 w/b length. Since we needed to lengthen this thing,
the next job was cutting the body in half where I would make
the stretch. Instead of making a straight vertical cut, I came
down part way, and then made a horizontal cut around 7 inches
long, then back down to a vertical cut. By doing this I was able
to basically slide the body forward, maintaining proper alignment.
You will see how this works later when I begin the splicing portion
of the job.
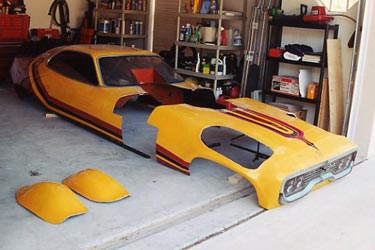
Now that the body is in half,
it made it easier to move around. This made a good time to fill
in the holes left by the bubble removal. Rather than bend and
hammer sheet aluminum into a form buck to cover the holes, I
waxed up the section next to the holes and used that shape to
make some fiberglass forms that I would fasten over the holes.
Once done, I flipped the nose upside down and filled in the holes
with several layers of chopped strand mat. After that hardened
the nose was flipped over again and the outside was covered in
plastic body filler.
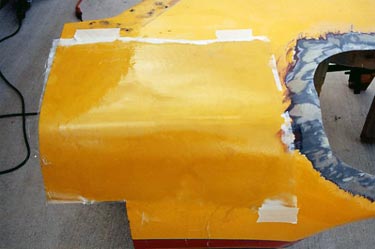
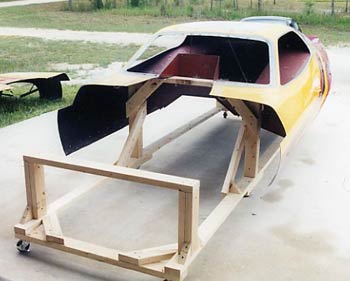
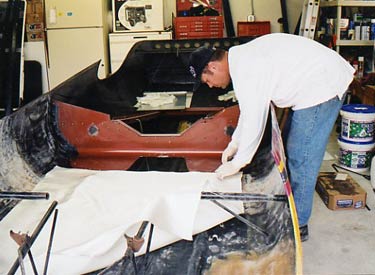
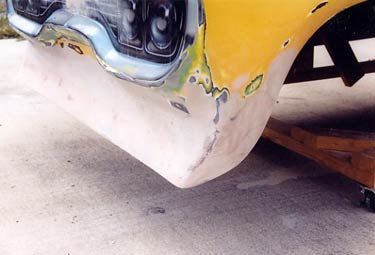
After getting the front fenders
into the basic original shape I moved on to the rear half of
the body. There were numerous holes to fill from the spoiler,
and I needed to fill the roll cage relief slots that were cut
into the rear window area. The design of this body didn't allow
it to be mounted low over the chassis without the roll cage interfering
with the rear window. As a result, many who used this body style
either cut out reliefs or made a couple of bubbles to clear the
rear bars of the cage. You will also see vent holes cut out in
the rear valence area; get out the mat, we have some filling
to do.
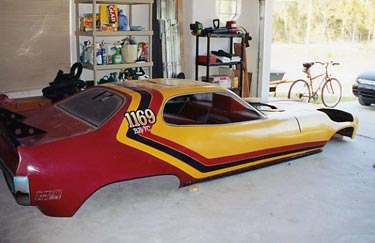
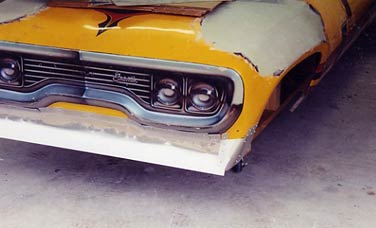
In the beginning I said the history
of this body wasn’t known. Well, I got a call from the guy
I bought the body from. Seems he found the previous owner who
used this for a BB/FC, who in turn said he bought this from Tim
Beebe. Huh? Considering my family’s history with the Beebe’s,
and the influence they had in my life, here I have the body from
the last funny car that Tim Beebe ever owned. Then to top it
off, after selling off the funny car operation, he partners up
with Jim Murphy which is an effort that still continues today
on Jim’s nostalgia TF team. Told ya this was ironic. At
any rate, in this shot you will see that famous “Fighting
Irish” green paint. If there are any doubts, many believe
there was only one green Satellite funny car that ever ran.
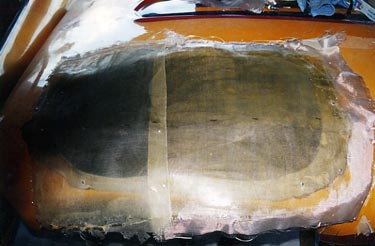
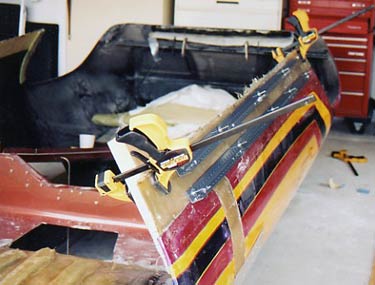
The next photos will show the
splicing process where 5 inches is added to the length. Where
the two halves are clamped together you can see how the initial
cut serves as a guide in lining up both ends. Once it was squared
up, I used some sheet aluminum and machine screws to secure the
body. A larger piece of aluminum was used to cover the blower
hole too. Since the resin doesn't stick to the sheet aluminum,
it also makes a good form when glassing in the area to be filled.
Something you will want to think about if you ever do such a
project; flip the body upside down, since gravity helps the glass
lay were it should, and the resin won't drip on your head.

You may remember that 5 inches
was trimmed off the lower edge of the sides, so we now must put
that back on. Using more aluminum, it is screwed on from the
outside utilizing what is left of the body line that transitions
to the rocker panel area. On the backside I mark a line where
the edge should be and proceed to lay up 2 layers of cloth. This
will leave a thin smooth layer once the aluminum is peeled off
and leave a nice even surface on
the backside to bond a wide strip of dense foam. To bond the
foam I mixed up a couple pints of resin, brushed some on the
backside and poured the rest on the foam. I set the strip up
on the side and held with clamps on both ends. To achieve even
bonding, and make the side straight once cured, I used a couple
lengths of angle iron on both sides drawn together with bolts.
While the glass
and foam was curing on the sides, I also added multiple strips
of foam on the underside of the hood area. As it was, the hood
wasn't the straightest, flattest place on earth, so I needed
to add some material that would make it rigid. If you ever tried
to use a sanding board on one of these bodies, you know how the
glass just flexes underneath making it nearly impossible to remove
any ripples.
So far, this
job hasn’t been too difficult, but now I need to recreate
the chin spoiler that was chopped off. Unlike the sides, where
you only need to make a smooth, straight panel, the spoiler had
a particular shape and contour. Thanks to Steve Gruenwald, he
lent me several magazines that featured funny cars with this
style body, and had some really good photos at different angles.
Finding a good photo, I then sketched out the side profile as
a pattern to transfer over to some aluminum. After attaching
the pieces on both sides, I made the frontal area. Using several
types of body hammers and some blocks of wood, I was able to
get the shape close enough to fasten under the bumper area.
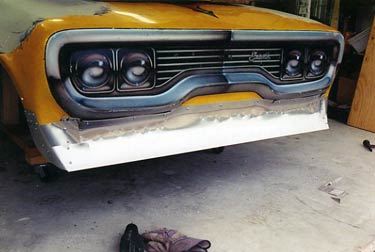
After making the aluminum form
for the spoiler, I then cut up pieces of chopped strand mat and
applied it to the back side. This was applied all the way up
as high as the grill area, since I needed to make sure it would
not break off from the final sanding and shaping that would follow.
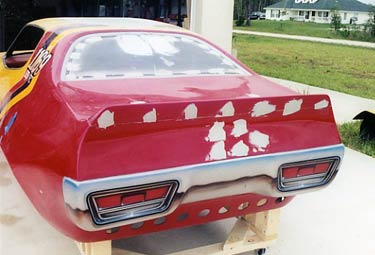
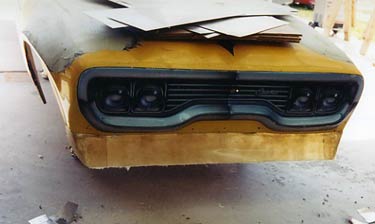
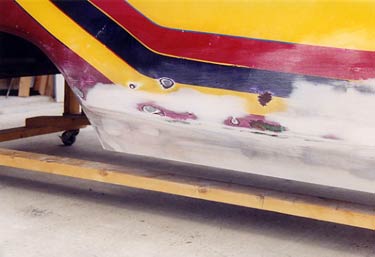
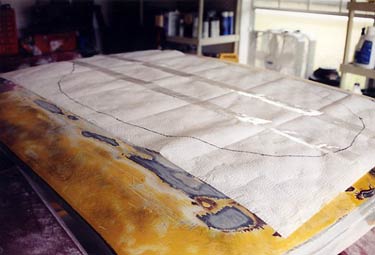
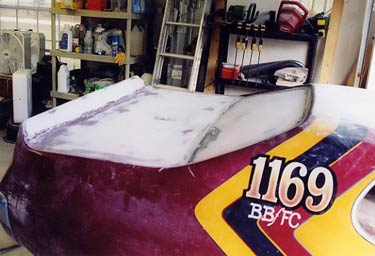
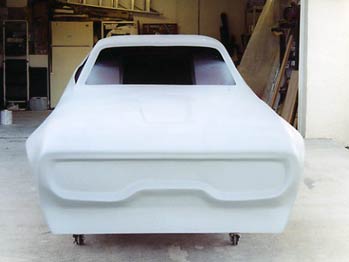
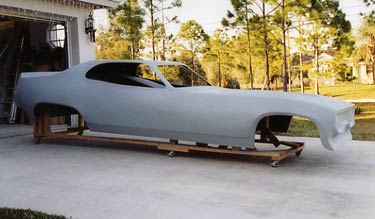
Having all the major glass work
completed, it was time to pour on the bondo; lots and lots of
bondo. Followed by lots and lots of sanding. Starting with the
hood area, I worked my way around, using a long board sander,
taking my time, having a few beers along the way. Then took care
of the spoiler, and finished up with the sides. I calculated
about 40 hours of sanding (back to back weekends, 10 hours a
day) to get this where it should be.
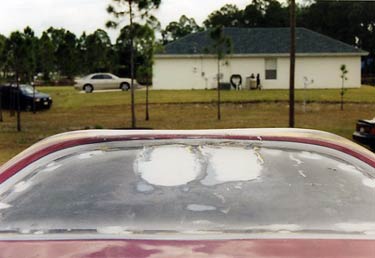
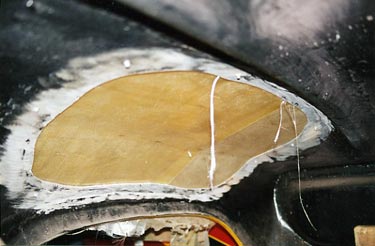
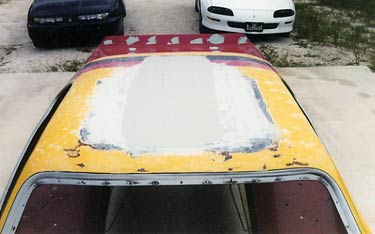
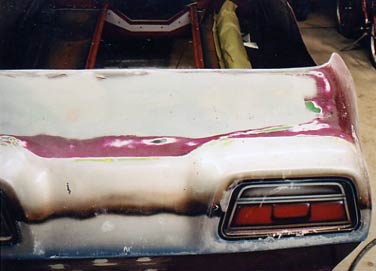
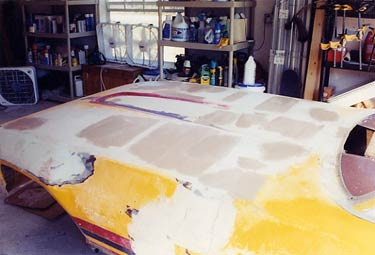
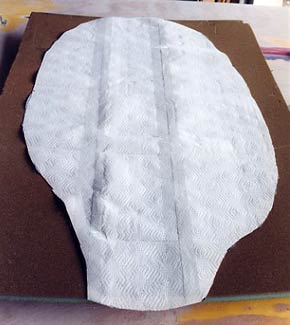
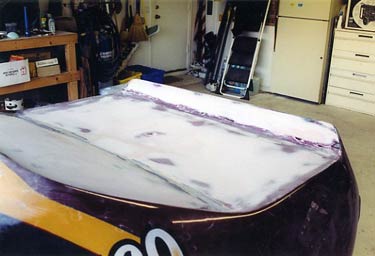
Something I failed to point out
back when the body was in two halves, I also sealed up the escape
hatch that was installed. For a variety of reasons, the roof
needed a TON of work. You will see in the first photo a profile
that shows how much the roof was concaved. I had already added
5 layers of mat and resin, along with 4 gallons of body filler.
This shot is after, and still shows that it is a long way from
being where it should be.
To expedite the process I used
a straight edge across the roof, and where the edge would make
contact, I would make a mark. Afterwards it was a matter of connecting
the dots to show where the depression was. I then made a pattern
of this shape, and cut out a piece of foam to bond onto the roof.
Taking a body grinder I proceeded to shape the roof as if I was
making a surfboard. Follow this with another 4 gallons of body
filler and another 10 hours of sanding with the long board, the
roof is back where it should be.
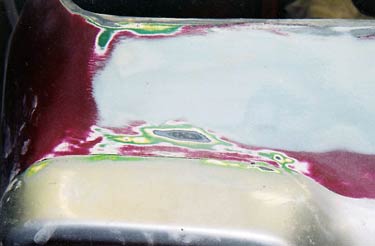
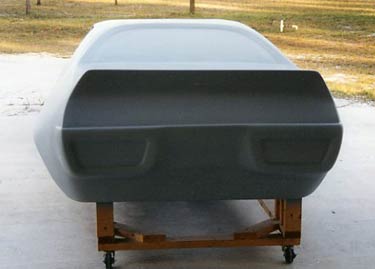
Here is another view to show
how the roof now has a nice crown. You cannot imagine how thick
this part is. I could have tried to push the roof out to eliminate
having to apply so much material. But, without any promise that
it would have worked, and putting stress on the front pillars,
I just decided to back up the bondo truck and pour out quite
a few gallons of plastic filler. After all, this is just going
to be a plug; a very heavy plug.
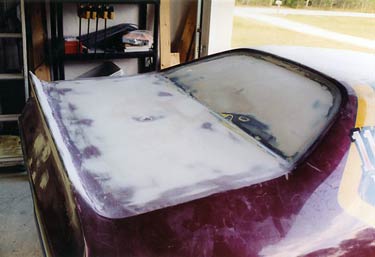
With arms feeling like jello
from all the sanding, it is time to move to the back end of the
body. The rear window area was kinda flimsy and not all that
smooth. The same can be said for the trunk lid area too. Get
out the bondo, lay down a nice coat, and start sanding. Actually
this part wasn’t too bad, and was the light at the end of
the tunnel. Once this was done, I went over the rest of the body
with a D-A sander to scuff up the shinny stuff, and feather out
the really bad sand scratches. After that it was time to do some
priming.
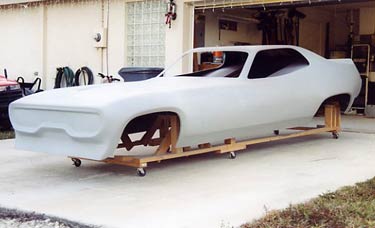
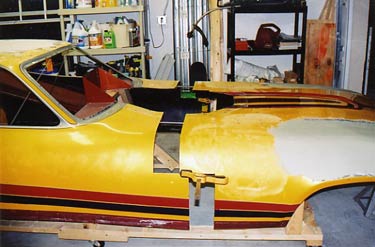
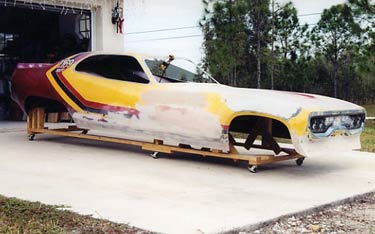
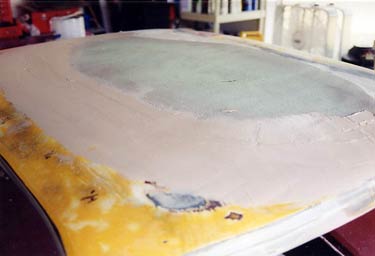
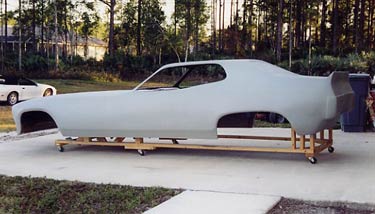
Here we are, New Years Day, and
I feel fine. Being a wimp, I didn’t go out drinking the
night before. Instead I was up nice and early, open up the garage,
crank up the tunes and the air compressor. Being it is about
7:30 in the morning, With all the racket I’m making outside,
I really hope my neighbors are not suffering from a hang-over.
Nonetheless, it is time to shoot the body with a high build primer.
This will give a good look at the transformation from the way
the body was when we first started. As you can see, it is quite
a bit different from the beginning. What will follow next is
some more block sanding, working towards finer grits of paper,
and eventually prepping the body to start the mold process. What
you have seen thus far has taken over a year to do, making time
when I have it between my primary business obligations. I hope
to have more updates on the mold process around the end of Jan,
beginning of Feb. So stay tuned.
The Saga Continues
- Sattelite Part Two
The Saga Wraps - Sattelite Part Three
E-Mail Dale: Dale
Smith
Back to WW2 Racing
|